• chevron_right

      Ce robot dessine sur une ardoise magique comme un artiste digne des années 80

      news.movim.eu / Korben · 3 days ago - 22:24 · 1 minute

    Vous êtes-vous déjà demandé comment dessiner comme un pro sur une a rdoise magique, ce jouet iconique des années 80 ? Pas simple, même pour les artistes les plus talentueux, car pour les plus jeunes d’entre nous qui n’ont pas connu ce jouet, le but c’était de tracer des formes complexes d’un seul trait en bougeant les molettes verticalement et horizontalement. !

    Mais grâce à la puissance du Raspberry Pi et un peu de bidouille, dessiner comme un vrai artiste sur cet objet est devenu un jeu d’enfant ou presque.

    En effet, le maker Micah Tilton a eu l’idée géniale de créer un robot dessinateur pour Ardoise magique, piloté par un Raspberry Pi afin de reproduire n’importe quelle image dessus de manière très précise, sans se prendre la tête. Le principe est assez simple (sur le papier en tout cas…). Un Raspberry Pi 4 commande deux moteurs pas-à-pas , fixés sur les molettes de l’ardoise grâce à des adaptateurs imprimés en 3D .

    Ensuite, un logiciel permet de transformer n’importe quelle image en une succession d’instructions pour guider le robot. L’image est d’abord redimensionnée à la résolution du jouet (plus ou moins 300 x 214 pixels), puis convertie en noir et blanc. Cette résolution a été choisie pour s’adapter parfaitement à la taille de l’écran de l’écran magique et un algorithme analyse ensuite comment la reproduire en un seul trait continu, comme en vrai.

    Et voilà comme ce petit robot peut maintenant dessiner en live des images complexes comme des portraits, des paysages ou des personnages en quelques minutes à peine. Le programme utilise des techniques d’optimisation poussées pour améliorer les performances et la fluidité du tracé et comme par magie, on voit les traits se former progressivement sur la planche, guidés par les mouvements millimétrés des moteurs.

    C’est franchement bluffant et un peu comme quand je regarde mon imprimante 3D bosser, ça a un petit côté hypnotique et fascinant.

    Micah a partagé le code source ainsi que les plans des pièces nécessaires sur GitHub donc si vous avez un Raspberry Pi qui traîne et une grande sœur qui avait ce joujou, vous pourrez recréer votre propre robot dessinateur à la maison.

    Source

    • chevron_right

      Quick Shed Door Repair

      JacobCoffinMakes · 5 days ago - 19:12 · 5 minutes · 4 visibility

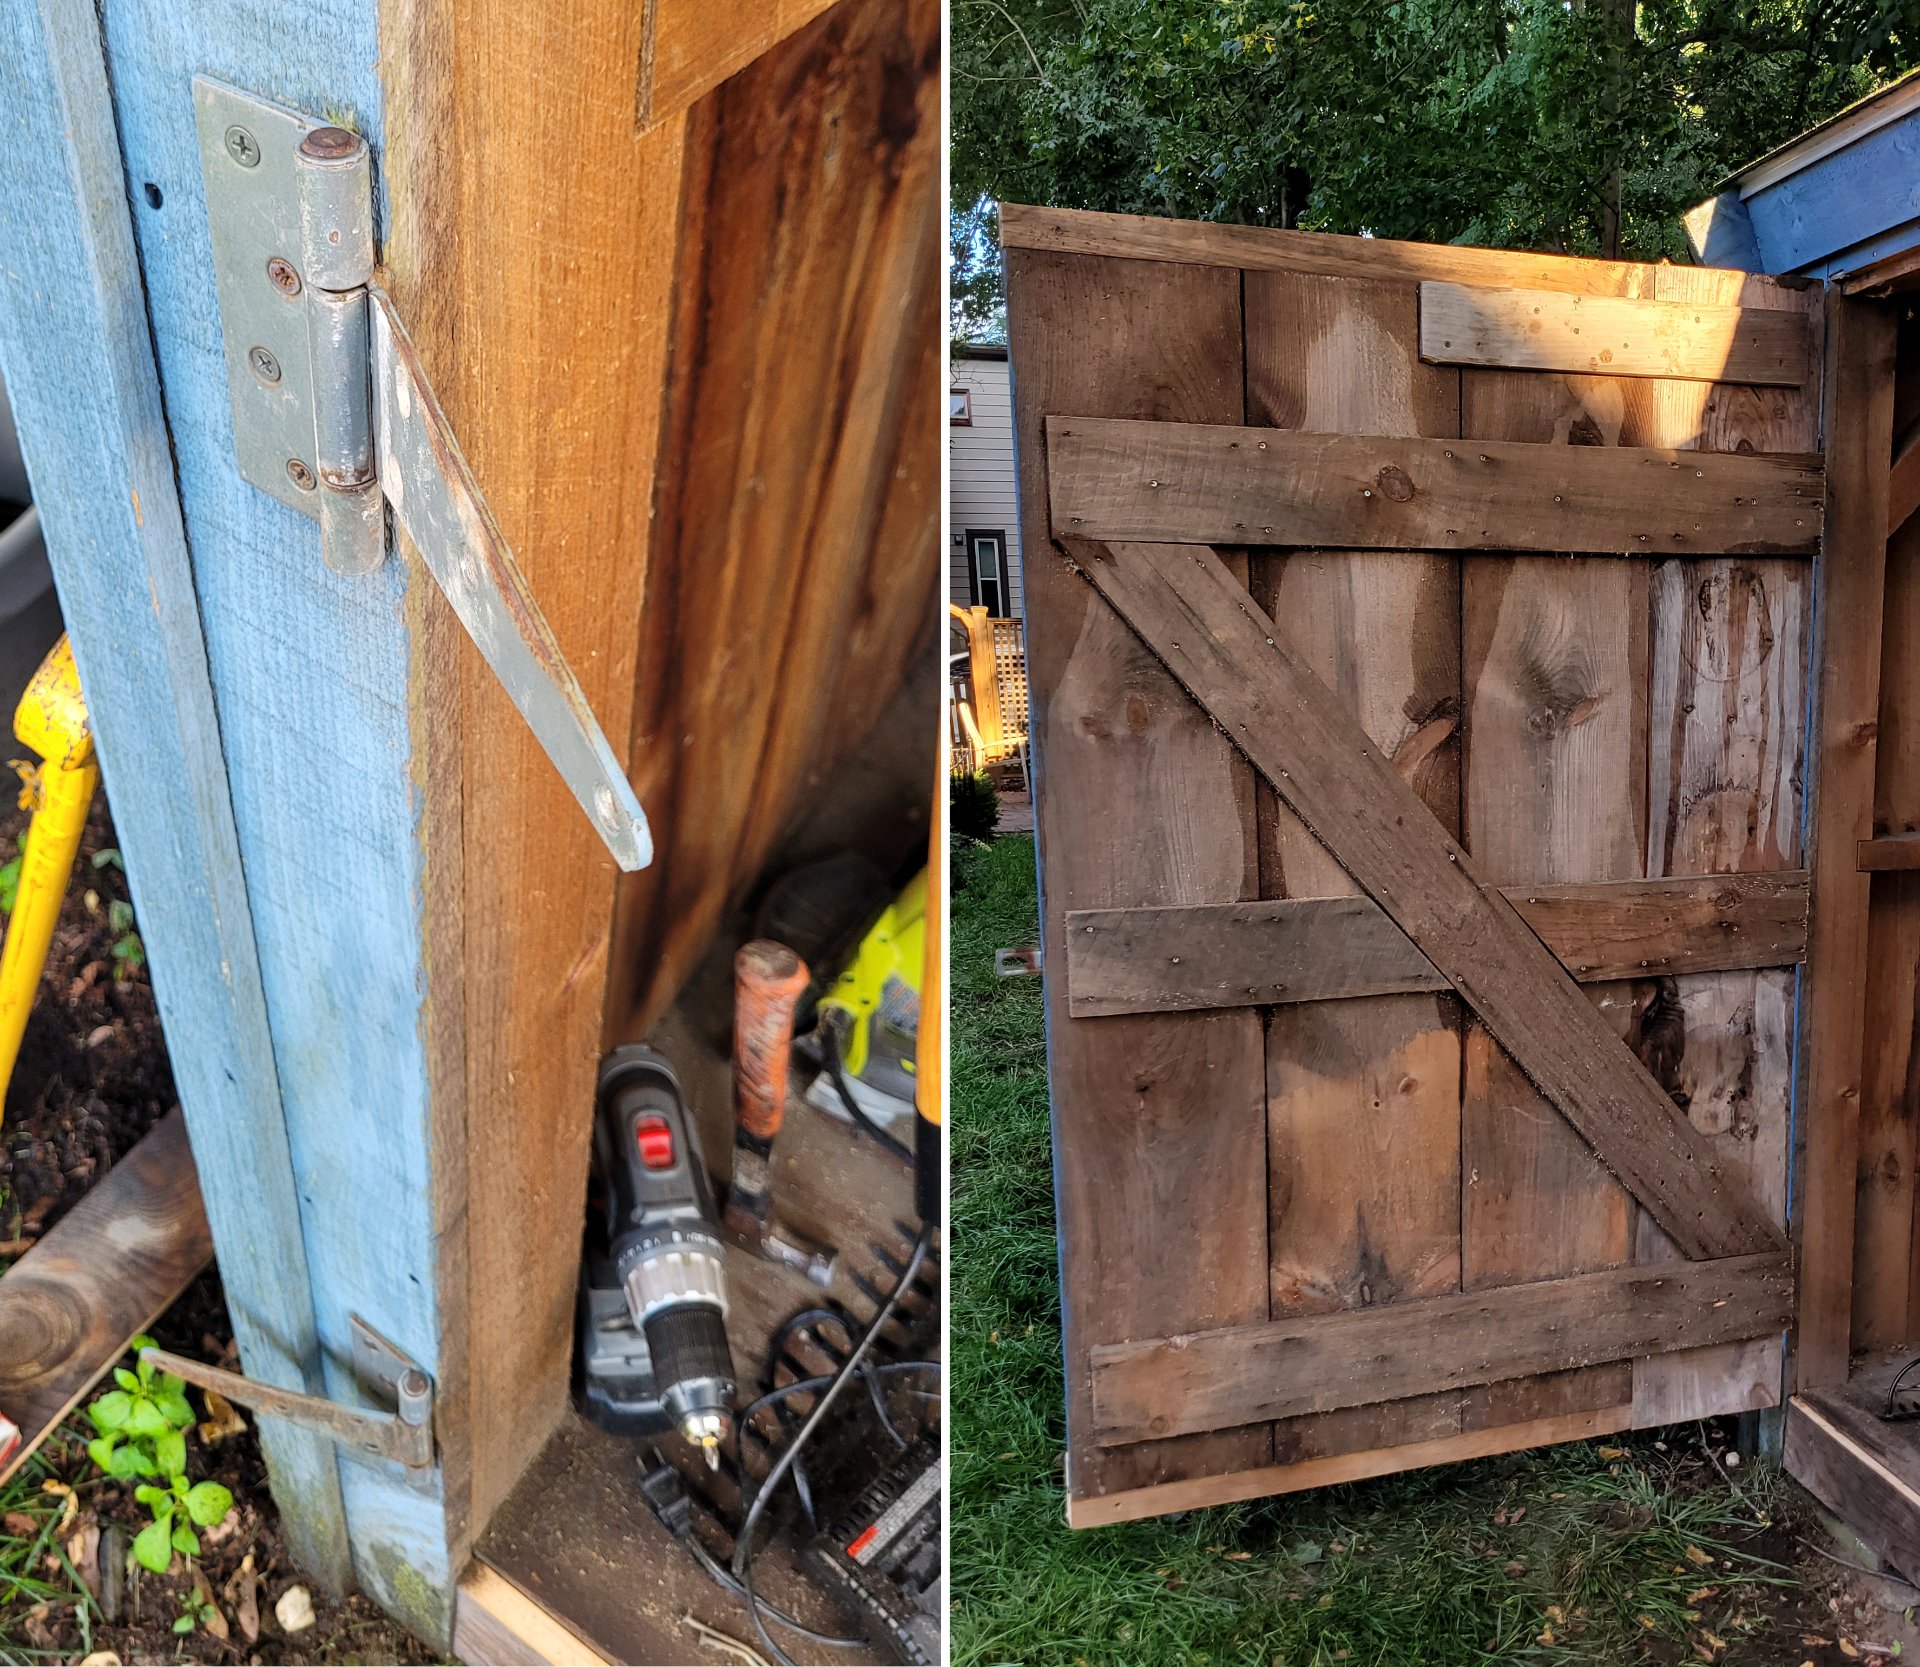
    This was a pretty quick little project - some of my friends recently bought a house, it came with a shed, and the door of that shed was broken. The design of the door allowed it to swing open about 180 degrees, at which point it'd hit its own frame.The wind must have caught it one day and swung it open hard. When that big wide door hit the frame so close to its fulcrum, it just snapped right down the line. It also bent all the hinges.

    The previous owners tried to fix it, it looks like by lifting the door back in place and driving some mismatched screws through some wood scraps and metal plates. That left the door drooping, hanging crooked in the frame, and flexing kind of alarmingly when it opened.

    We'd talked about taking it down and fixing it properly, I even took some measurements.

    Then one morning I got lucky, I saw a post on our local Buy Nothing -type page where someone was offering up some 1"x12" boards they'd been using as shelves in a shed. They were a bit weathered but otherwise in good shape (no cracks, warp, or rot). It was trash day in that neighborhood so I hustled out there and claimed the whole pile. 1"x12"s ain't cheap.

    On the way back I picked up a shovel with a cracked handle which I fixed with a hose clamp and have been using for a couple years now.

    We set a day, I packed the lumber and tools, and we started in on the shed. I think we also planted a peach tree (using my new shovel) that day.

    We started by taking the door off the shed and setting it on some sawhorses I brought.

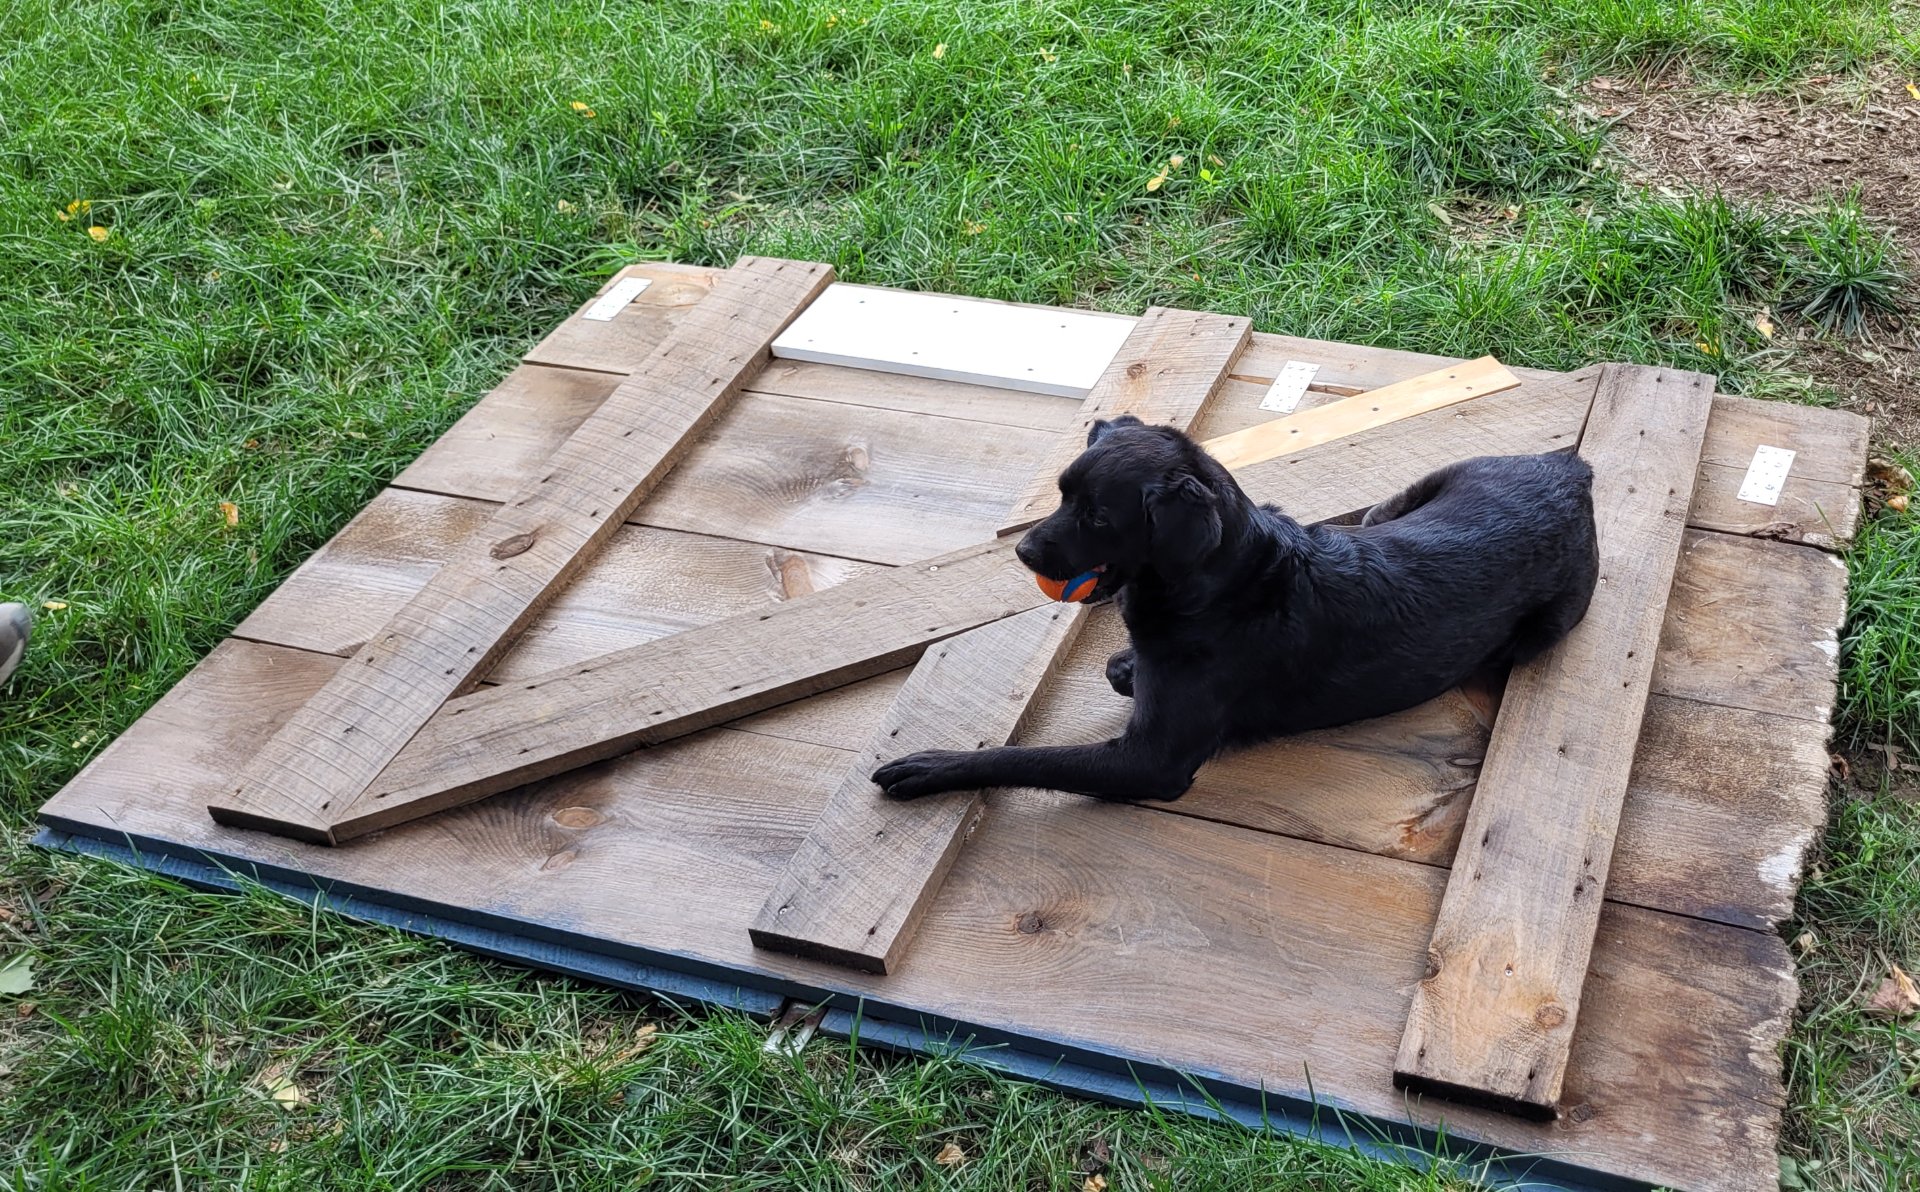
    (Dog helping hold down the door)

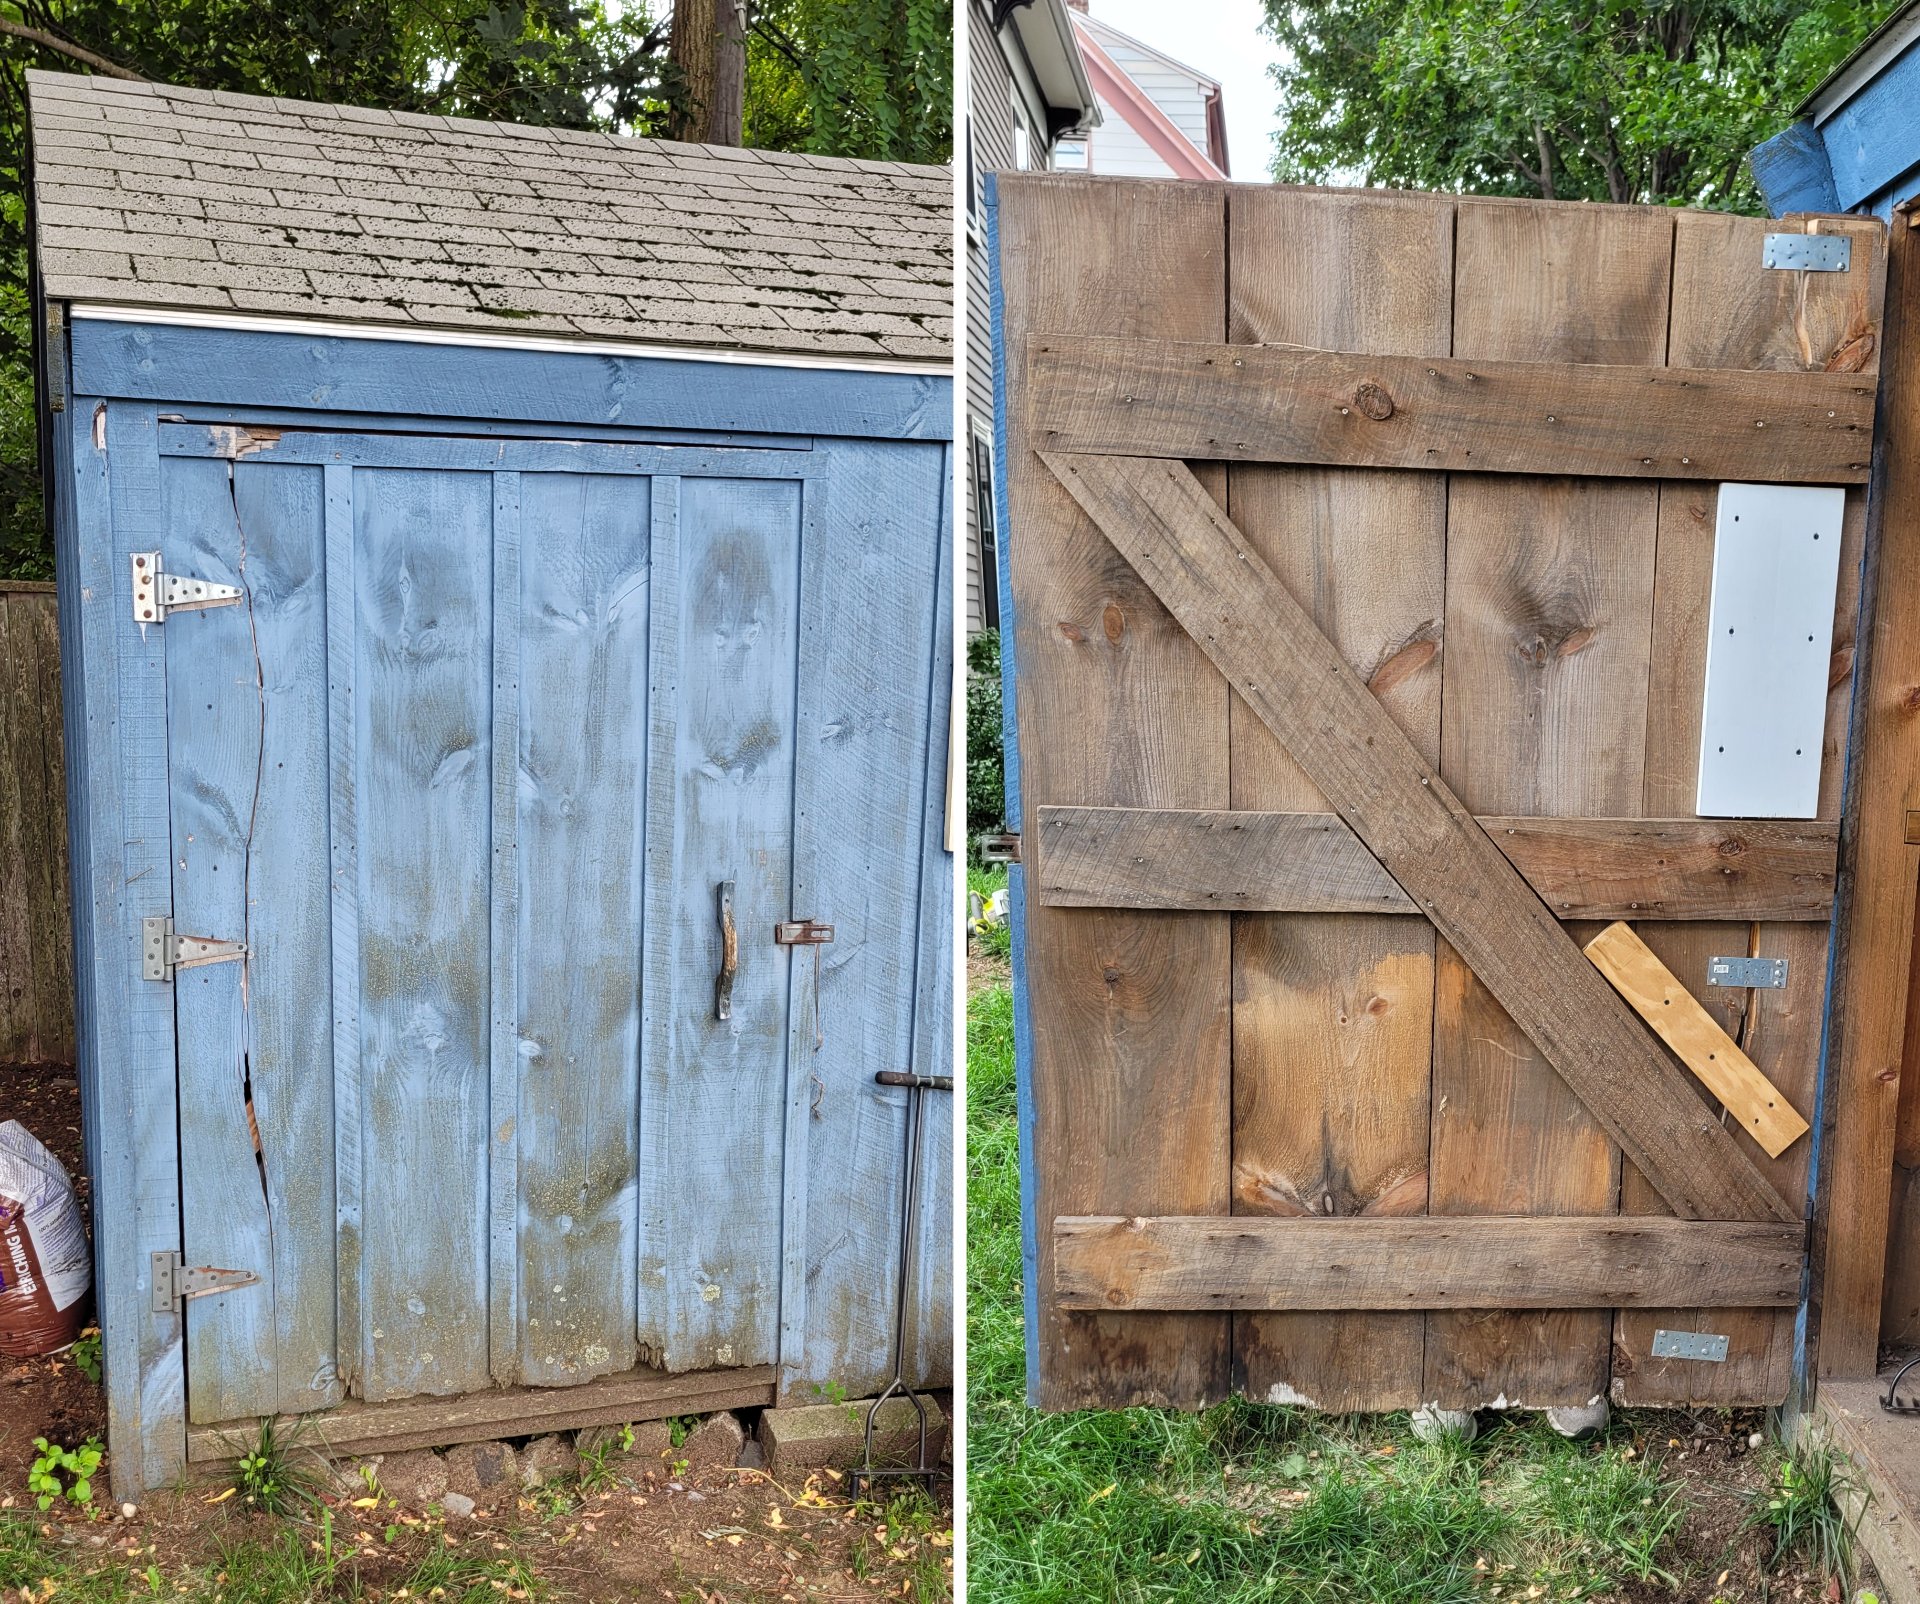
    This was where we made our first unfortunate discovery. The shed was older than we'd realized. The 1"x12"s the door had been made from were rough cut, not dimensional, so the boards I'd brought were about half an inch narrower, and a quarter inch thinner than the originals.

    So we had a couple options here - all the boards were rotten for a few inches of the bottom. We could replace all of them with the new ones, which would be a close fit of all our materials, and would lose us a couple inches of width unless we added another board, or we could save lumber all around and change the design to keep most of the existing door but make it a little janky. They were good with that, so we did a kind of strange design.

    First we removed the split board and it's support scraps and set them aside. Then we cut one of the new boards to the original/final height of the door.

    Next we measured far enough up to catch all the rot, and we cut the door that much shorter.

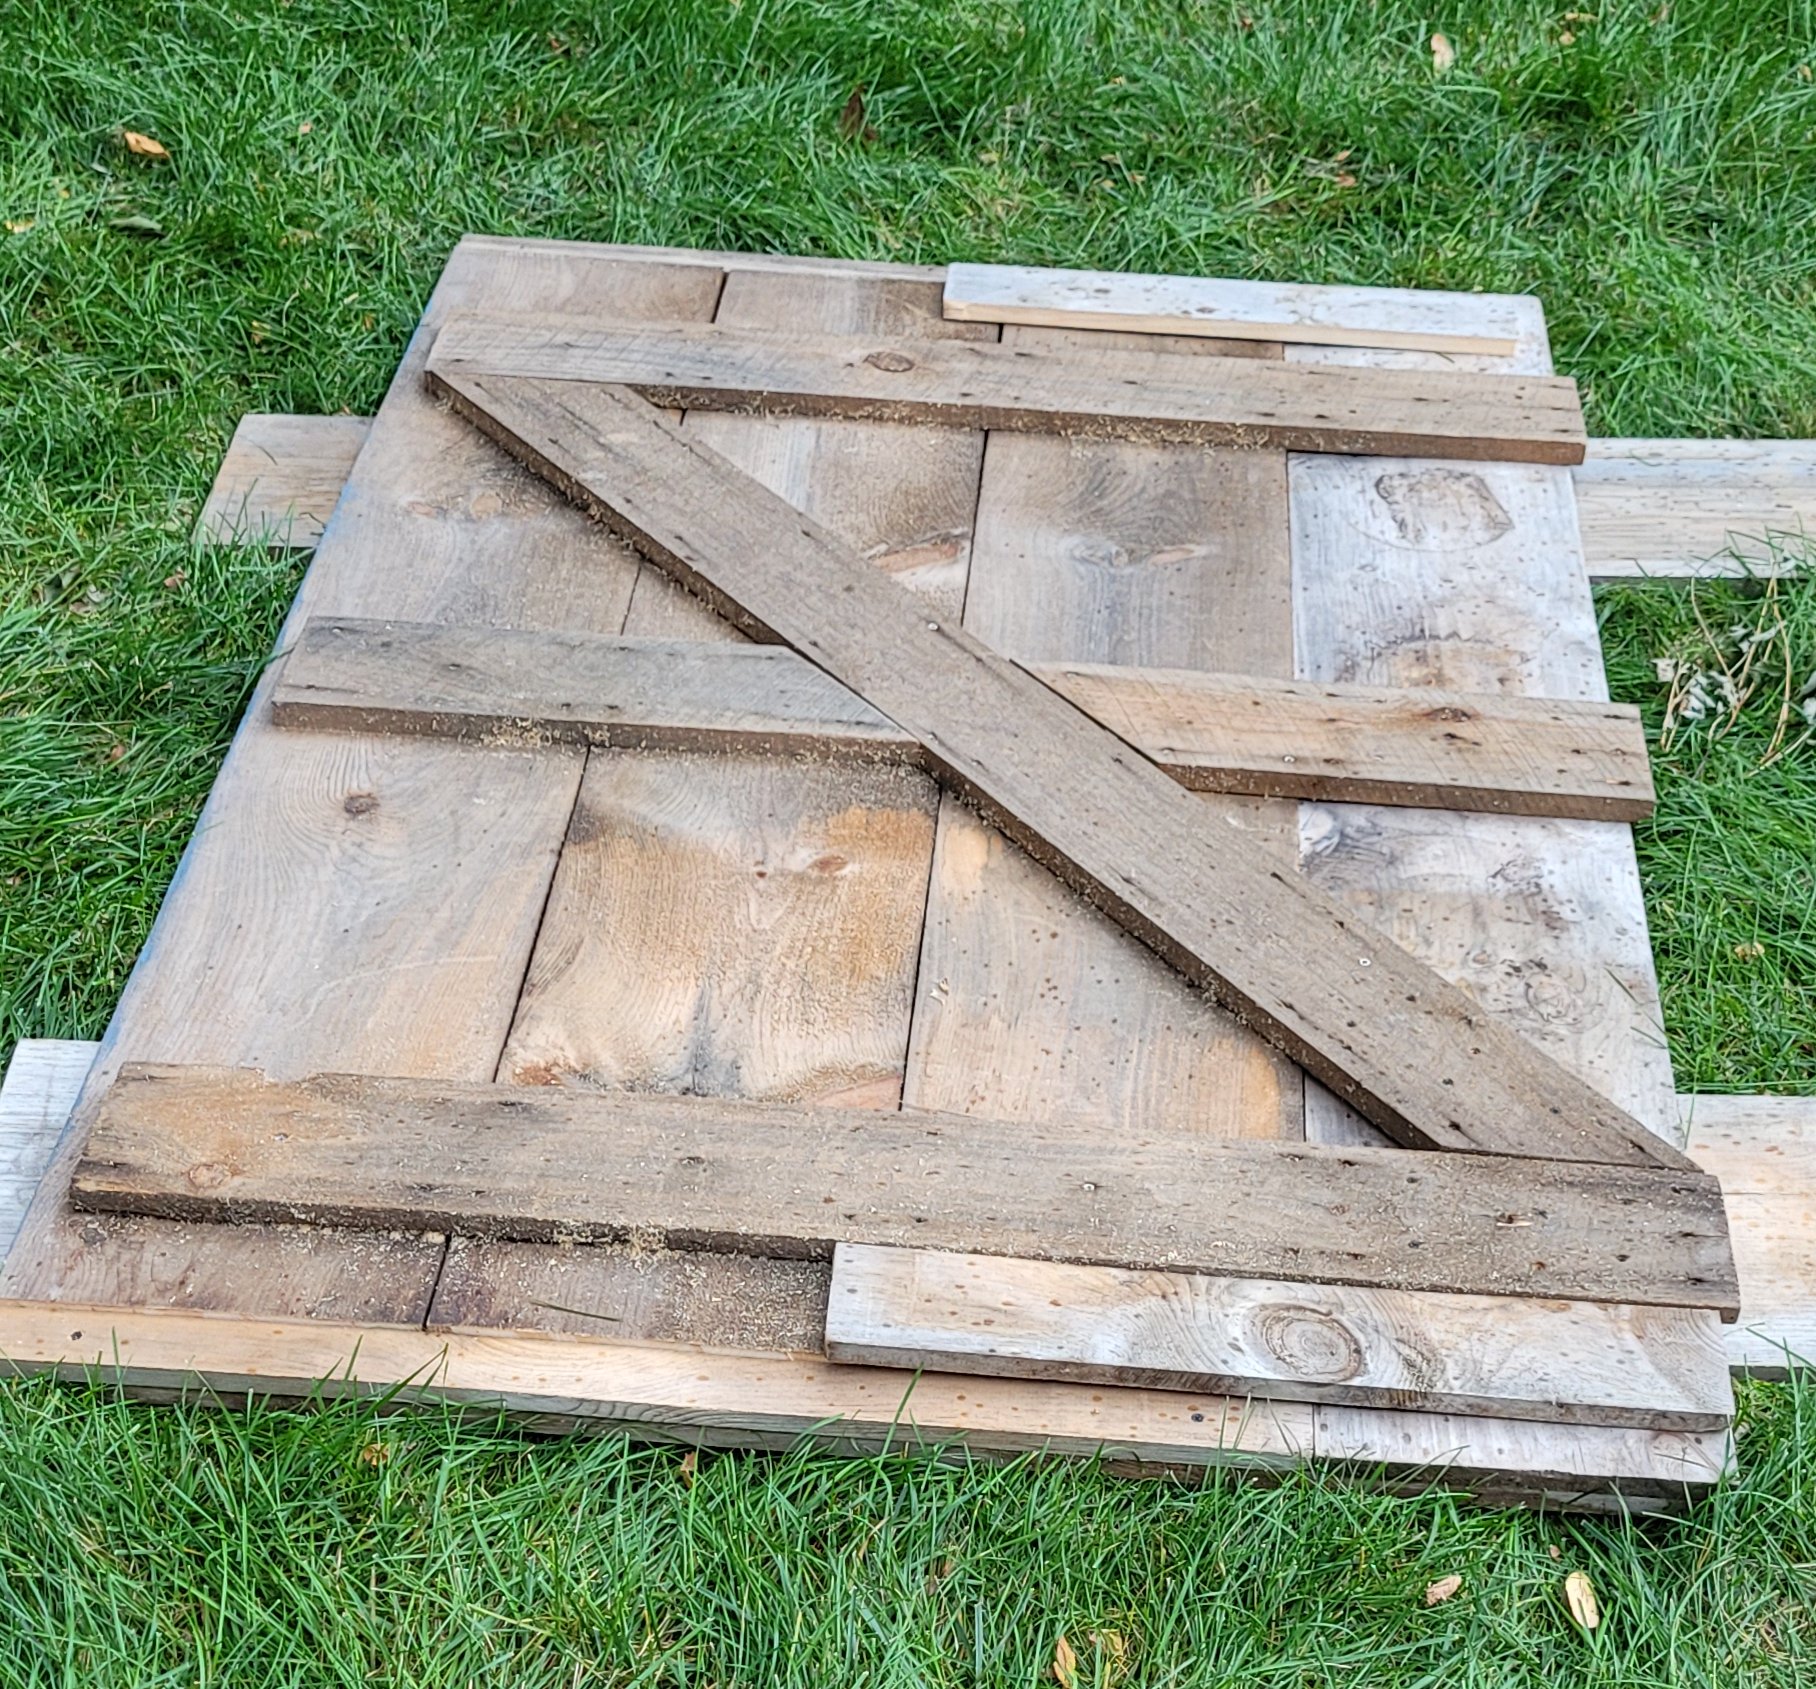
    We attached the new vertical board so it extended a couple inches at the top and bottom (it's on the right in the picture above). Then we added two braces across the face of the door, so they went across at the final height of the door/the long new board, leaving a bit of space above and below the old boards. These would add some extra ridigidity, by having pieces going across on the front and the back, and they'd hide the difference in length. Then we cut some pieces to go behind them, fitting flush above and below the old boards. These weren't structural, they just took up space so critters and weather wouldn't get in.

    Once the door was made, we started looking at hanging it again.

    Unfortunate discovery two: the doorway was crooked. Part of that was the fault of the badly rotted board which crossed the doorway under the door. It didn't seem to be doing anything but catching rain and soaking it up, so we pried it off and replaced it. Luckily it only crossed the doorway, it wasn't actually part of the building frame, which seemed to be in okay shape. The top of the doorway was also out of square, but not enough to be a major problem. As they reminded me a few times, it's a shed, not a house.

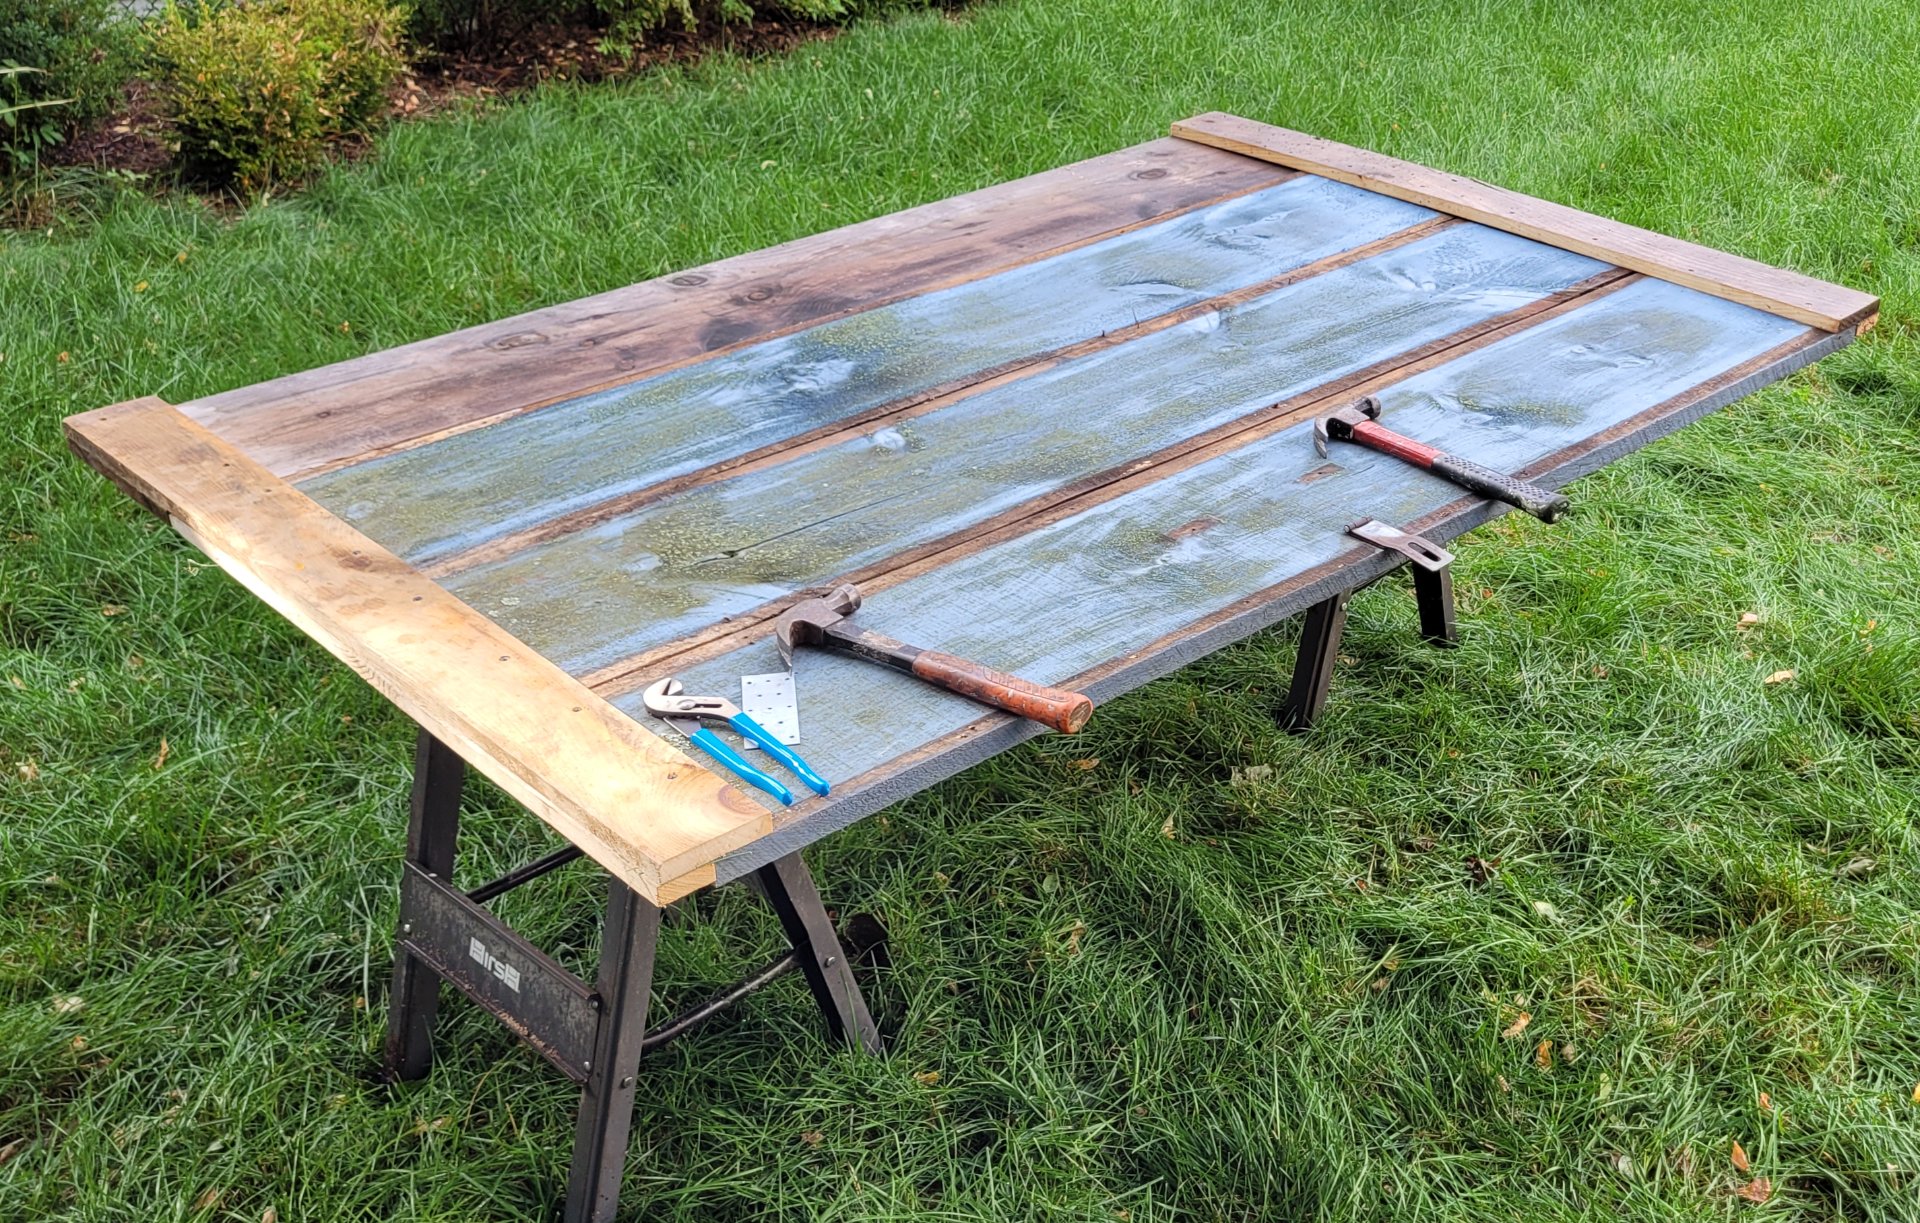
    We straightened out the hinges by putting them on a brick and pounding on the high points with a small sledge (not ideal but it worked). Then we hung them back up and attached the door. From what I remember, it sat just above the new lower plate when it was closed, might have rested on it but I don't remember.

    The last step was to cut a thin piece to attach to the inside of the door frame to make up for the width lost by replacing a roughcut board with dimensional.

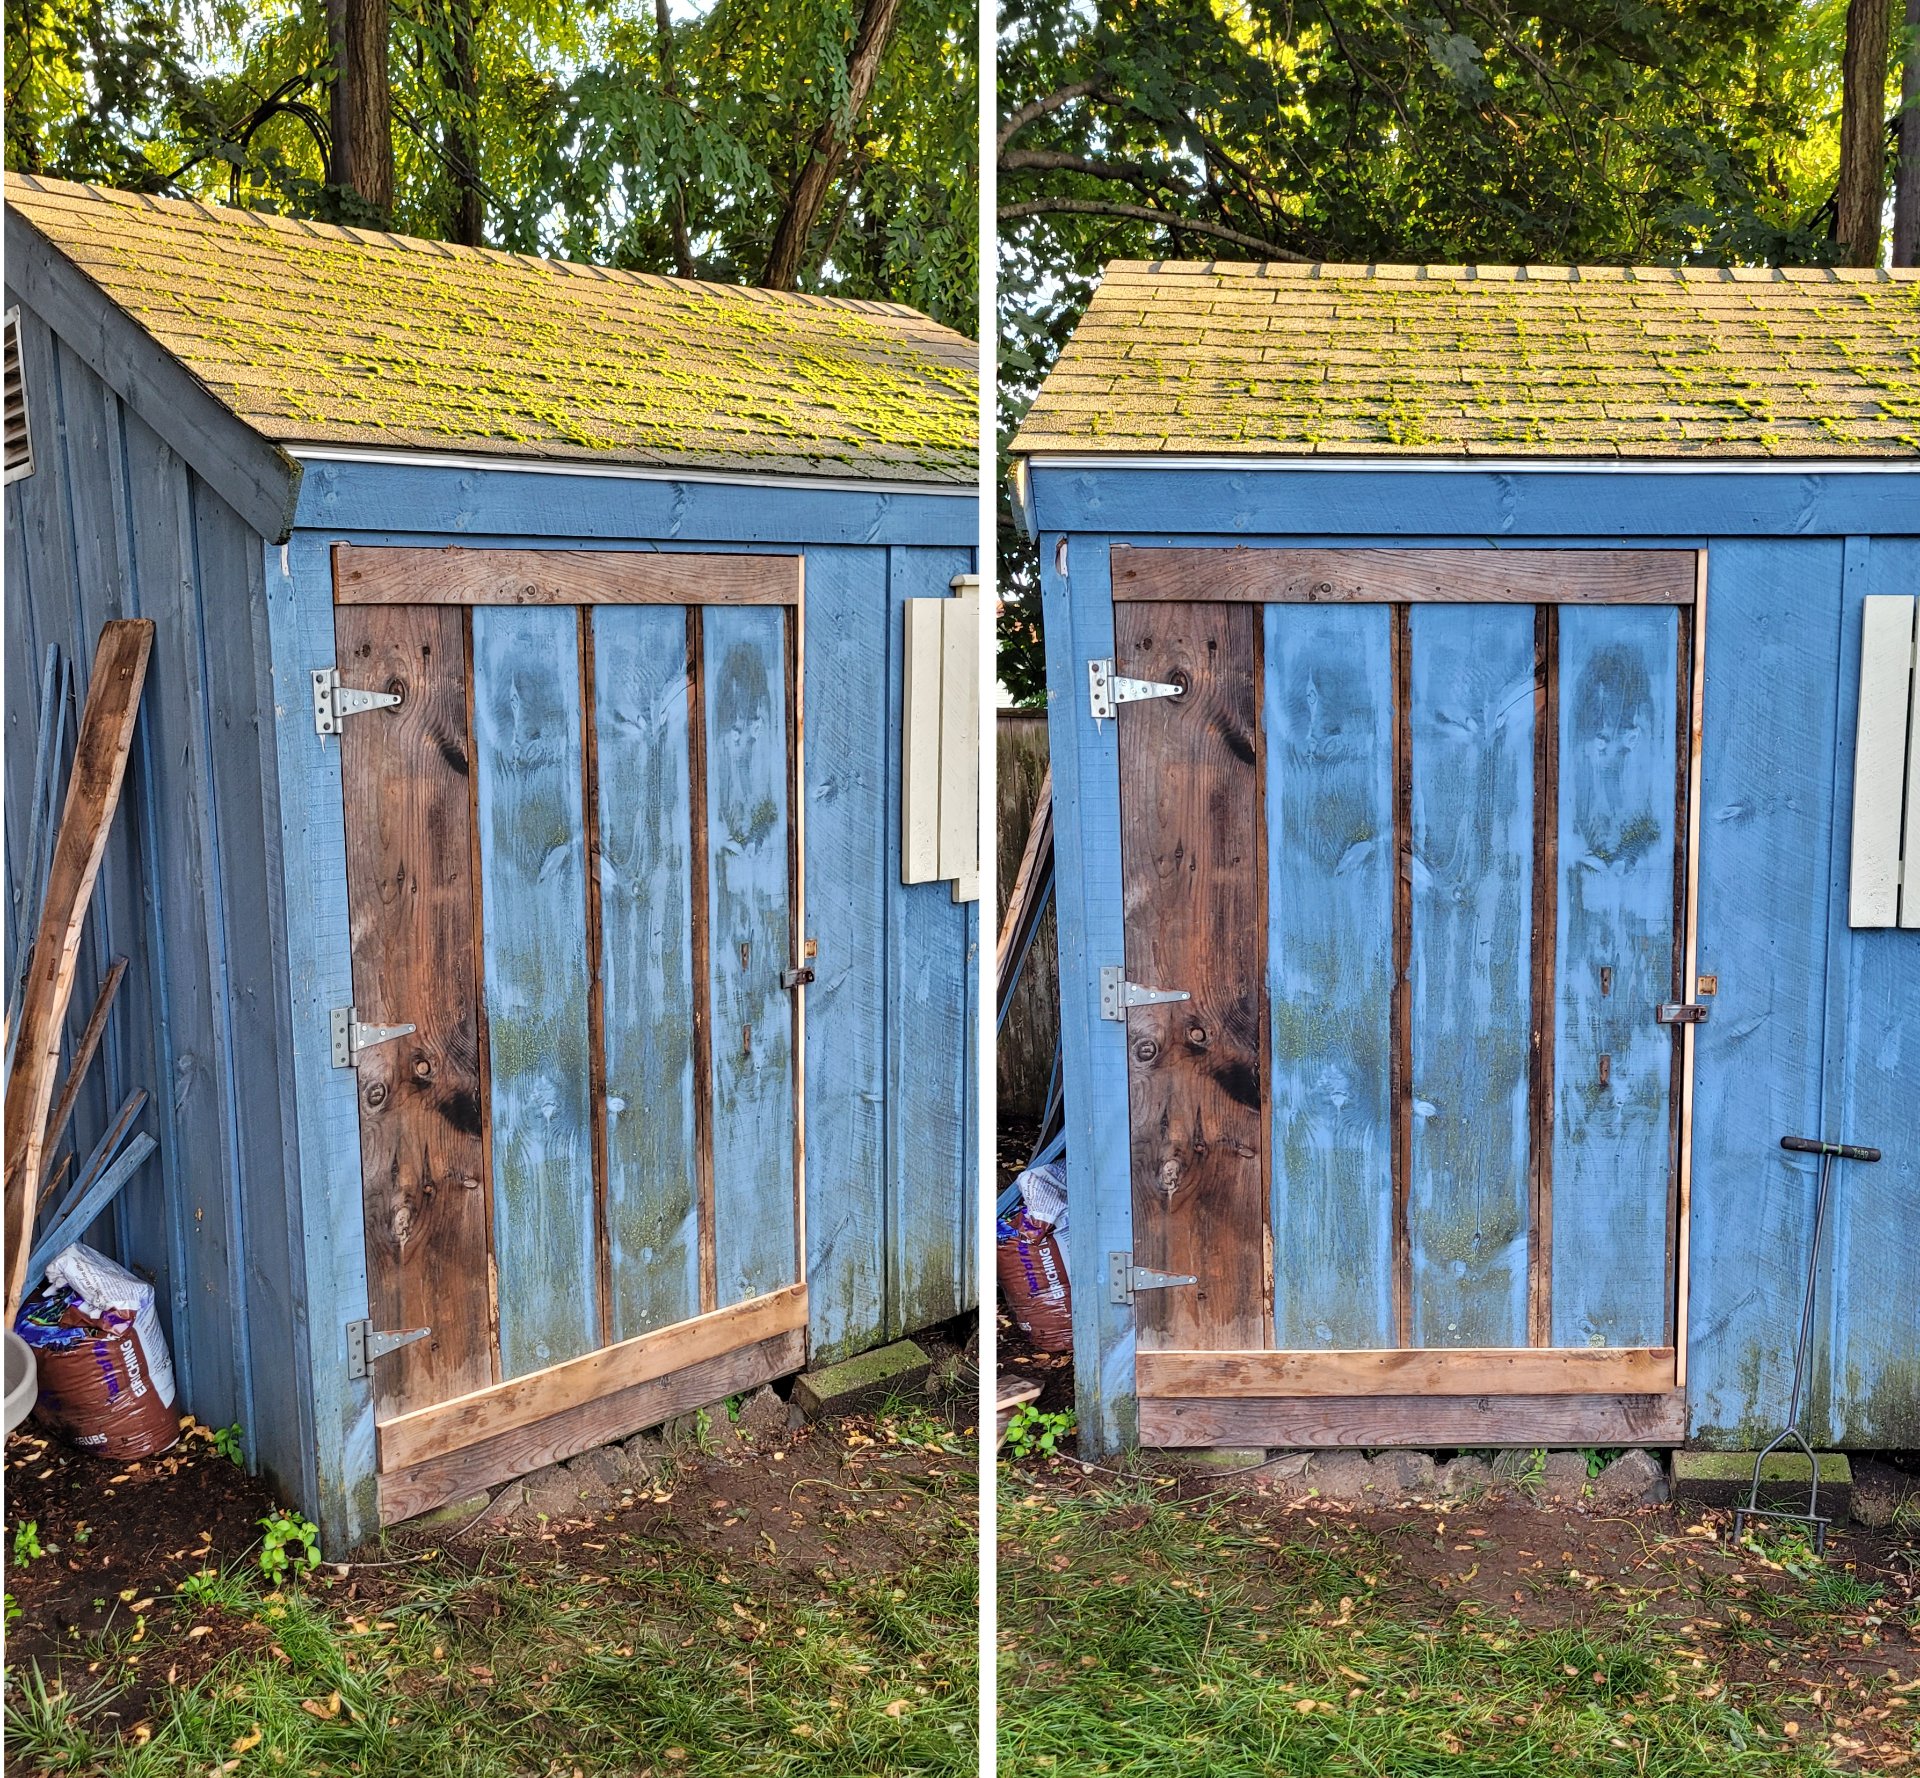
    From there, I think we called it good. It had rained on and off during the project, and we didn't want to re-attach the trim while it was wet for fear of trapping water between the boards.

    We cleaned up the tools and had some pizza.

    As a side project, I took the original, very rotted wooden door handle, and the scraps of the split board. From the dimensions of the original and the look of the wood, I figured they cut the original from scraps of the same roughcut 1x12s they built the rest of the shed out of, so I wanted to make the replacement the same way.

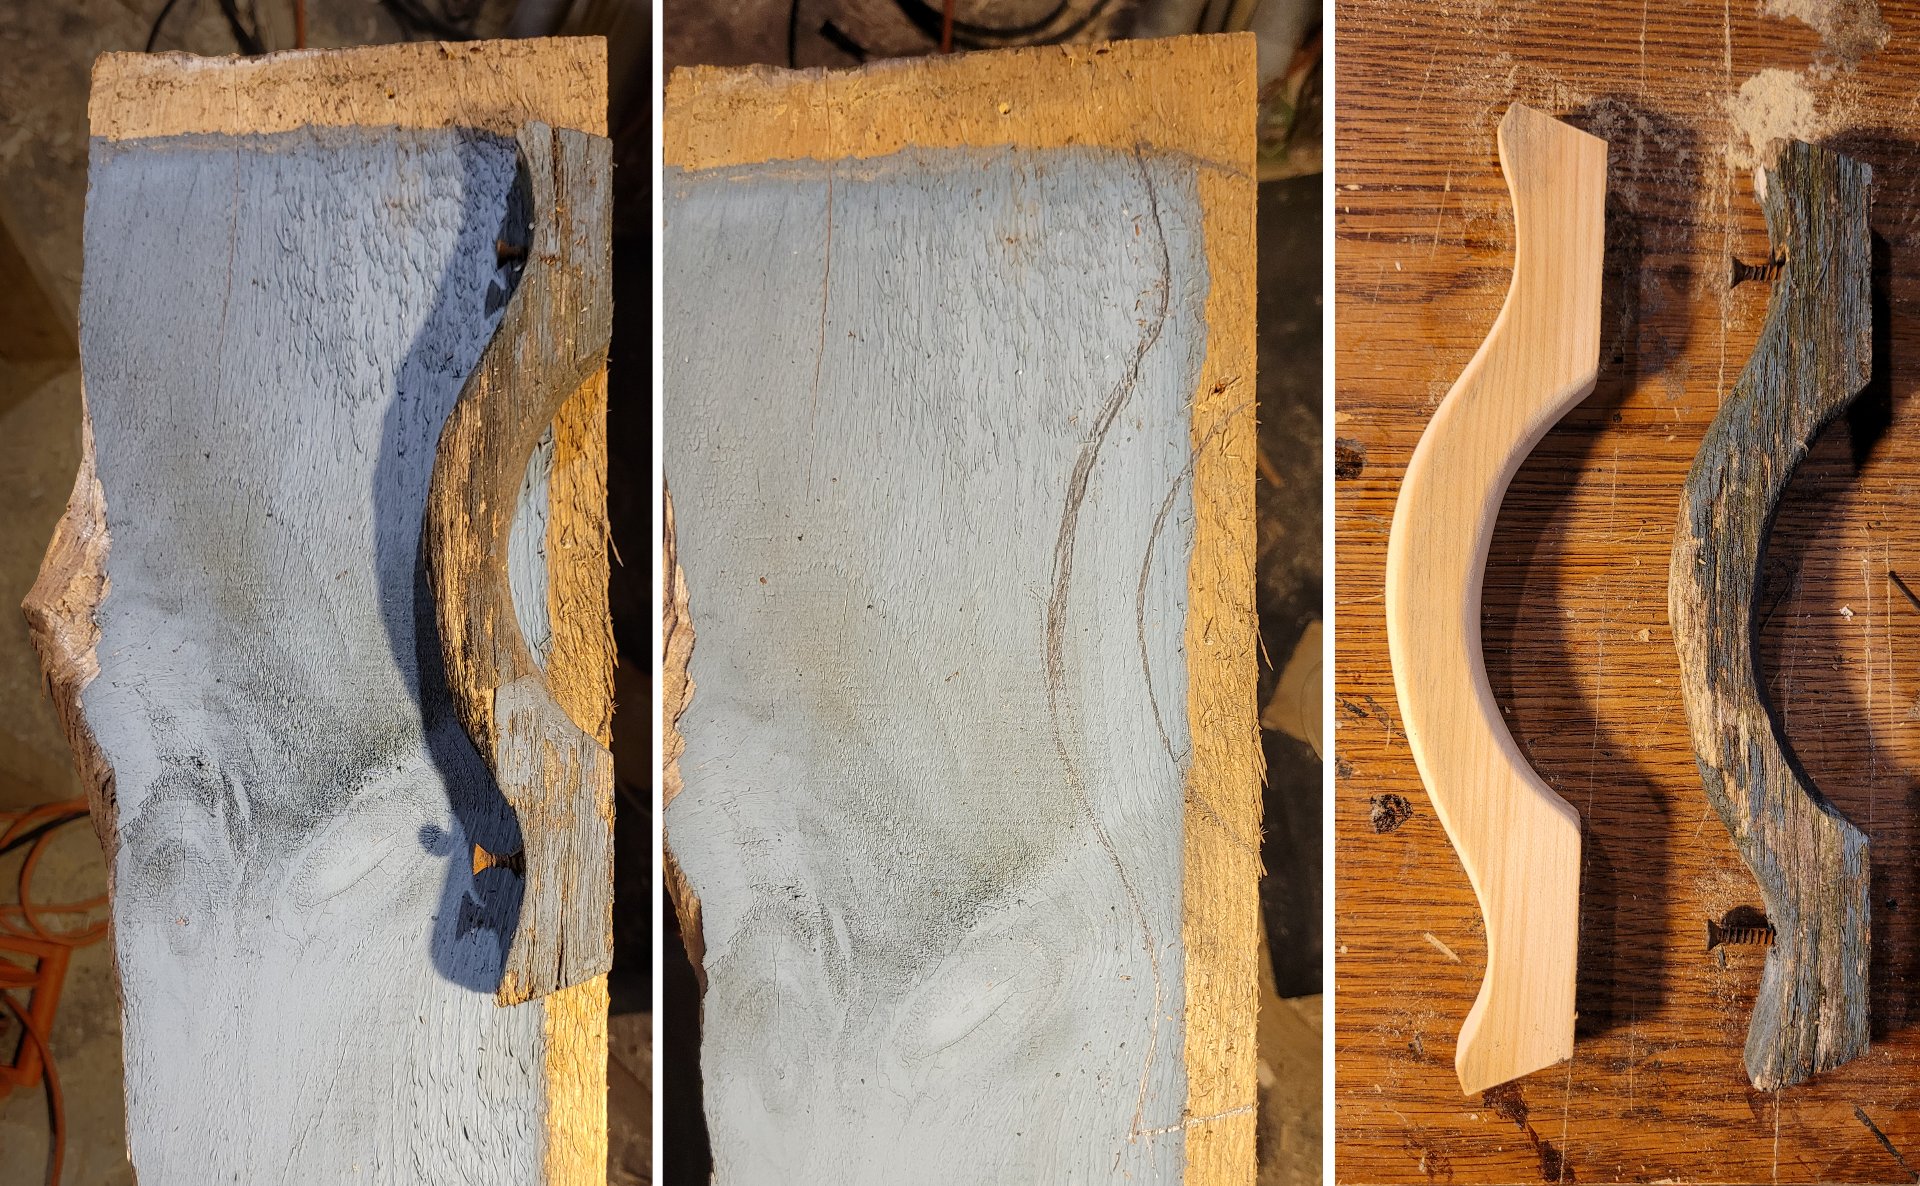
    I traced the original onto the wood, flipped it end for end, and traced it again, and sort of averaged the two. The original wasn't actually symmetrical but my replacement would be much closer. Then I started sanding it down until it was comfortable to hold. I pre-drilled the holes for the screws, including space for the heads, so they wouldn't split the handle when it was attached.

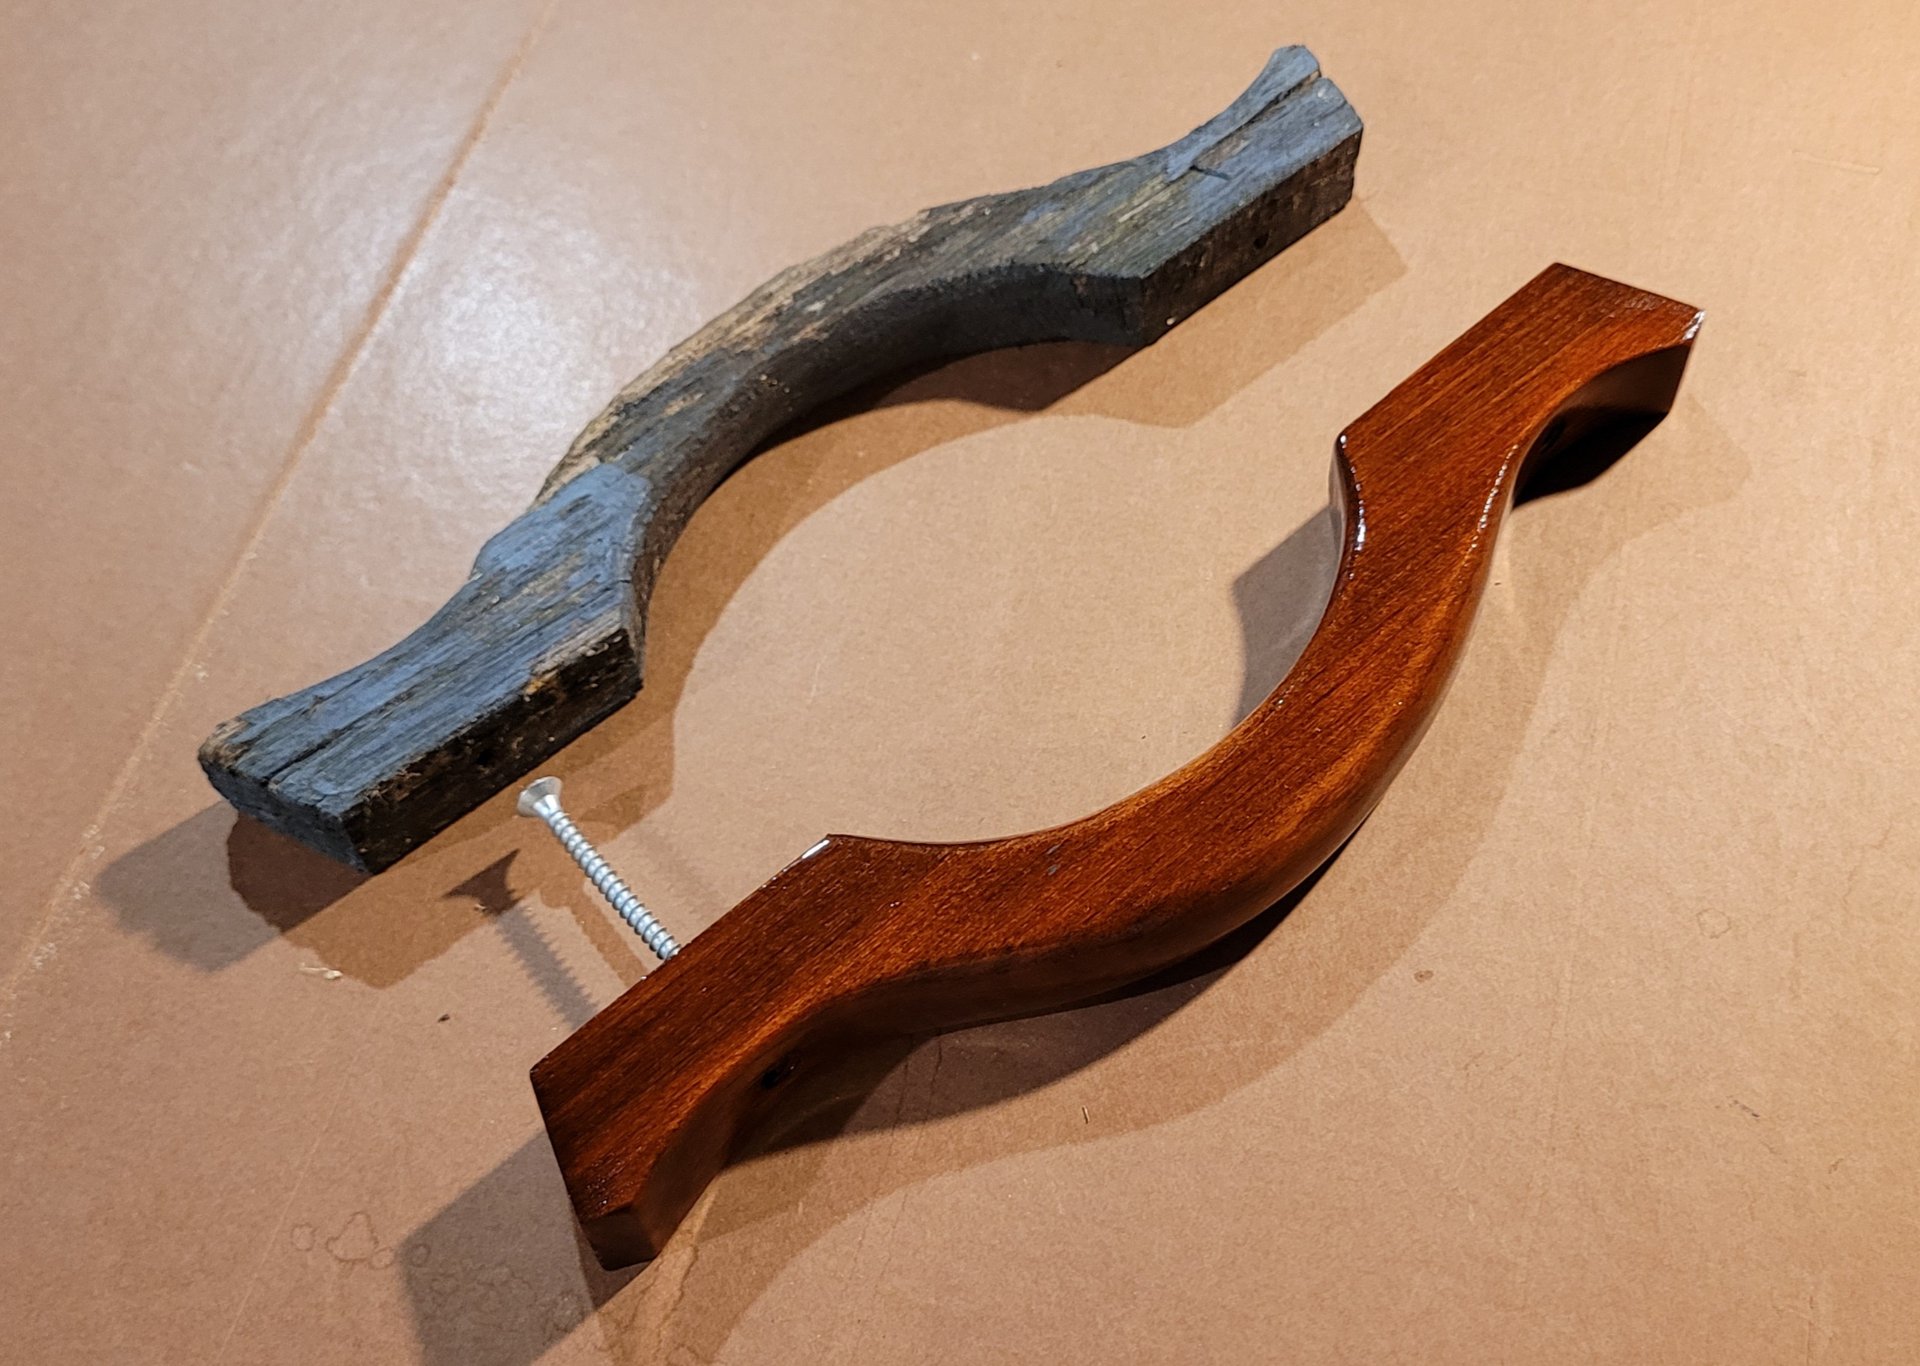
    I stained it, I think my usual mix of Gunstock and Red Oak, then applied a few coats of urethane, sanding lightly between coats. I even got the back, where it'd touch the door, and the holes for the screws. I figured they could paint it whatever color they painted the door, like the original, or leave it as-is, either way it'd be very waterproof and last a long long time.

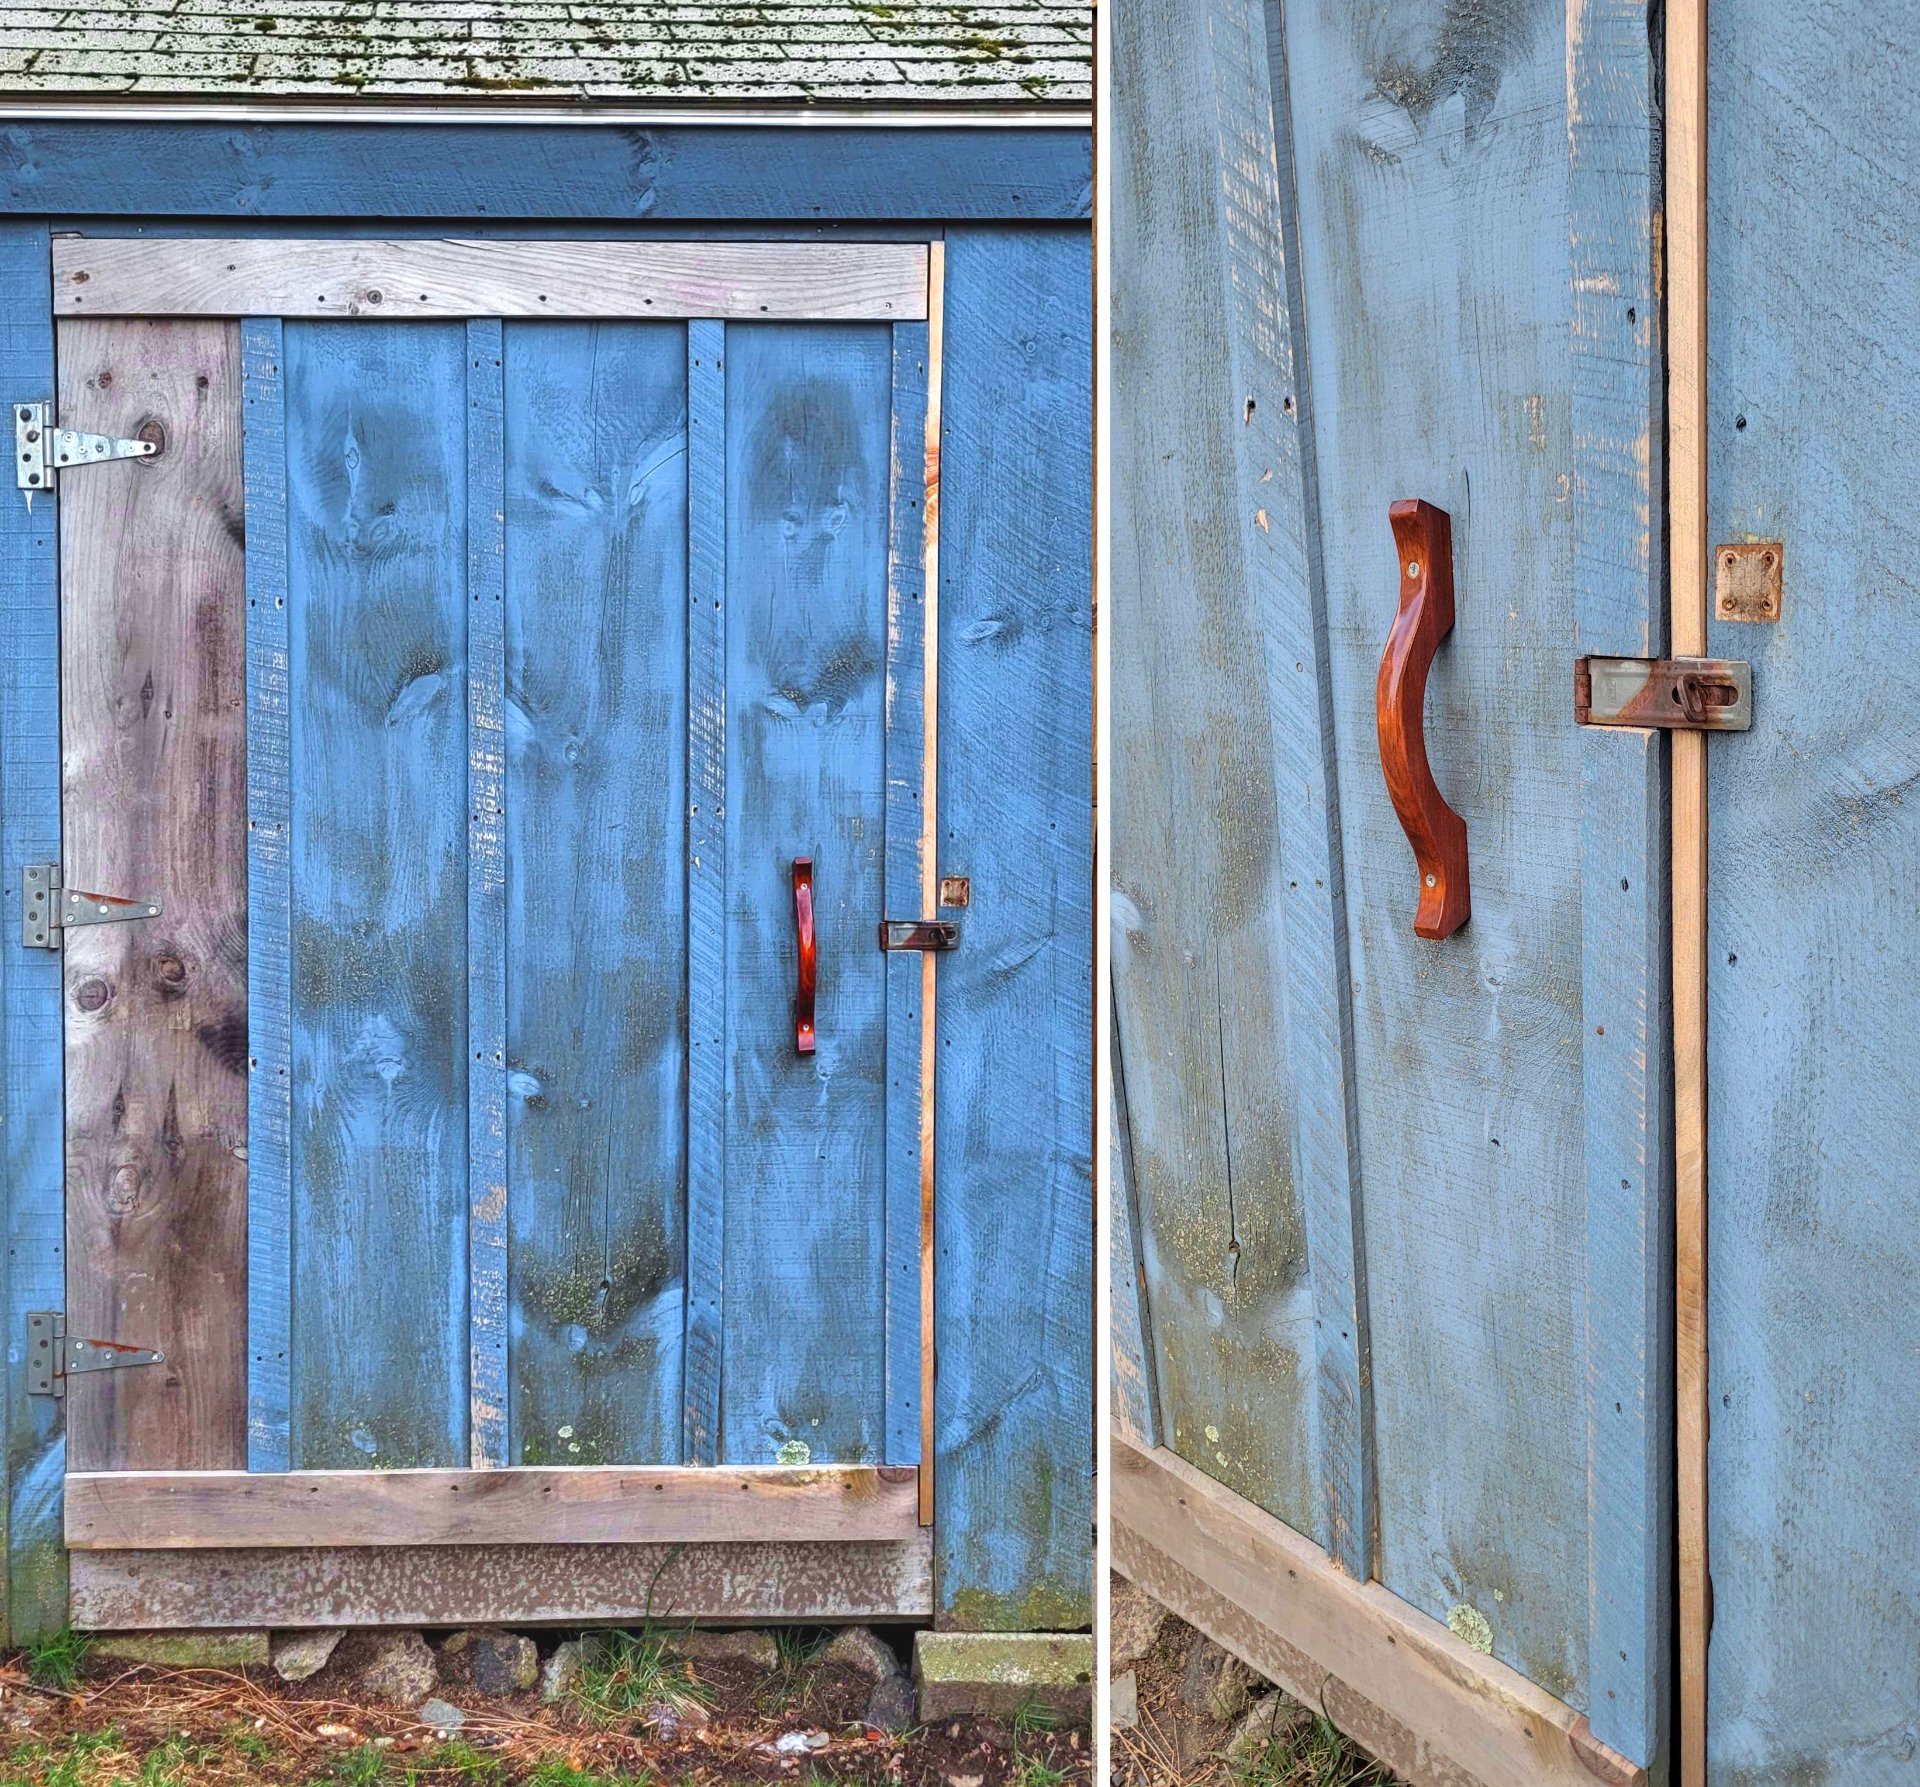
    All it needs now is a new coat of paint.

    #fixing #DIY #woodworking

    • wifi_tethering open_in_new

      This post is public

      movim.slrpnk.net /blog/jacobcoffinwrites%40slrpnk.net/055a65d8-b666-48a1-8976-ce47b5cd064f

    • Pictures 11 image

    • visibility
    • visibility
    • visibility
    • visibility
    • visibility
    • visibility
    • visibility
    • visibility
    • visibility
    • visibility
    • visibility
    • favorite

      1 Like

      albeert

    • chevron_right

      Whomane – L’IA portable & open source

      news.movim.eu / Korben · 6 days ago - 07:00 · 2 minutes

    Accrochez-vous bien à vos slips, parce que je vais vous parler d’un truc de ouf qui risque bien de révolutionner le monde de l’IA portable : Whomane ! Ouais, vous avez bien lu, c’est un projet open source de wearable avec une caméra intégrée.

    Whomane, c’est un peu le rêve de tout maker qui se respecte : un appareil portatif bourré d’IA et de capteurs, le tout en mode open source pour pouvoir bidouiller et créer ses propres applications. La vision derrière ce projet, c’est de rendre l’IA embarquée accessible à tous, que ce soit pour l’utiliser ou pour développer dessus.

    Concrètement, Whomane se présente sous la forme d’un petit boîtier à clipser sur soi, un peu comme une broche hi-tech. Mais attention, pas n’importe quelle broche ! Celle-là embarque une caméra, un micro et du logiciel capable d’analyser votre environnement en temps réel. Et le tout est propulsé par un raspberry pi Zero capable de faire tourner des modèles de deep learning directement sur l’appareil.

    Maintenant, vous vous demandez sûrement ce qu’on peut bien faire avec un truc pareil ? Eh bien, les possibilités sont quasi infinies ! Imaginez par exemple une application qui reconnaît les visages et affiche des infos sur les gens que vous croisez. Ou encore un assistant personnel qui analyse vos conversations et vous souffle des réponses. Vous voyez le genre ?

    Mais Whomane, c’est aussi et surtout une plateforme ouverte et collaborative. Le code source est dispo sur GitHub , avec une licence GPL pour les projets open source et une licence commerciale pour ceux qui veulent l’intégrer dans des produits fermés.

    Alors okay, je vous vois venir avec vos grands chevaux : « Oui mais la vie privée dans tout ça ? C’est Big Brother ton truc ! » Alors oui, évidemment, dès qu’on parle de caméra et d’IA, ça soulève des questions. Mais justement, l’avantage d’un projet open source comme Whomane, c’est la transparence. Tout est là, à disposition de la communauté pour auditer le code et s’assurer qu’il n’y a pas de dérive. Et puis bien sûr, il faudra toujours veiller à respecter les lois et réglementations en vigueur.

    Bref, vous l’aurez compris, Whomane c’est le genre de projet geek et utopiste qui fait vibrer la corde du bidouilleur qui sommeille en nous. Après, on ne va pas se mentir, c’est encore un prototype avec sûrement plein de bugs et de limitations. Mais quand bien même, qu’est-ce que c’est excitant de voir émerger ce genre d’initiatives !

    • chevron_right

      NUCA – L’appareil photo qui met les gens à poil

      news.movim.eu / Korben · Tuesday, 9 April - 20:01 · 1 minute

    Beaucoup d’entre-vous en rêvent depuis longtemps et bien ça y est, il existe enfin un appareil photo capable de vous voir nu, même si vous êtes habillé.

    Baptisé NUCA , cet appareil photo expérimental utilise l’intelligence artificielle pour générer des portraits nus à partir de simples photos de personnes habillées. Mais attention, ce n’est pas un jouet pour voyeurs en mal de sensations. C’est avant tout un projet artistique mené par Mathias Vef et Benedikt Groß, deux artistes qui souhaitent interroger notre rapport à la nudité et à la technologie.

    Leur objectif c’est de provoquer une réflexion sur les dérives potentielles des deepfakes et de l’IA générative.

    Car oui, si ça peut sembler amusant au premier abord, ça soulève en réalité des questions éthiques fondamentales qui sont d’ailleurs fortement éprouvées en ce moment. Je pense à ces cas de plus en plus fréquents de détraqués qui détournent de vraies photos, principalement de femmes, pour les passer à la moulinette du deep fake.

    Car même si ce n’est pas réellement elles sur ces photos IA, et bien ces femmes se sentent à juste titre agressées sexuellement, et choisissent parfois d’arrêter partager publiquement la moindre photo ou s’exposer sur Internet, ce qui les prive encore un peu plus de liberté et de parole.

    C’est là tout l’enjeu du projet NUCA : Nous faire prendre conscience des dangers des deepfakes et à l’importance cruciale du consentement dans ce nouveau monde technologique. Ce projet invite aussi à réfléchir sur notre rapport au corps et à la nudité dans notre société où les corps nus sont parfois tabous, parfois surexposés.

    Et si vous voulez en savoir plus sur ce projet fascinant et dérangeant, je vous invite à visiter le site officiel .

    Source

    • chevron_right

      Un client IRC fonctionnel intégré dans un BIOS

      news.movim.eu / Korben · Sunday, 7 April - 13:24 · 1 minute

    La news de ce dimanche, c’est que Phillip Tennen, un de ces génies du clavier a réussi l’impensable : faire tourner un client IRC directement dans le BIOS de sa carte mère, sans même avoir besoin d’un système d’exploitation !

    Alors, pour faire simple, le BIOS (ou l’UEFI maintenant), c’est comme le cerveau reptilien de votre ordinateur. C’est le premier truc qui se lance quand vous appuyez sur le bouton « ON », avant même que Windows, Linux ou MacOS ne pointe le bout de son nez. Normalement, ce bidule sert juste à vérifier que tout est en ordre et à passer la main au système d’exploitation. Mais voilà certains se lèvent un matin et décident que ce serait cool d’y coller un client IRC.

    Alors concrètement, à quoi ça ressemble ? Eh bien ça a une vraie interface graphique, avec des polices TrueType et tout le toutim et notre bonhomme a même implémenté quelques commandes IRC de base, histoire de pouvoir tailler une bavette avec les copains sans même avoir à démarrer Windows. Pratique pour les soirées LAN où on a la flemme d’attendre que l’OS se lance ! (Quoi ça existe plus les soirées LAN ?? ouinnn)

    Ça montre qu’avec un peu (beaucoup) d’huile de coude et une bonne dose de créativité , y’a pas de limites à ce qu’on peut faire avec nos bécanes même si dans 99% des cas, ça sert à rien, faut bien l’avouer.

    Mais bon, je sais que parmi vous, y’a plein de bidouilleurs de génie qui rêvent déjà de faire tourner leur propre truc dans le BIOS, alors si vous voulez vous lancer, je vous conseille d’aller jeter un œil au code source et aux explications concernant ce fameux client IRC pour UEFI. C’est bourré de commentaires et d’explications, de quoi vous donner des idées pour vos propres projets délirants. Perso, si y’en a qui sont chaud, je vous commande un browser, une version offline de Korben.info et un client Twitter pour BIOS.

    Bref, ça ne va pas révolutionner nos vies mais ça reste une sacrée prouesse technique !

    Source

    • chevron_right

      ‘It’s a worldly thing’: the ancient, multi-stranded craft of weaving baskets

      news.movim.eu / TheGuardian · Saturday, 30 March - 23:00

    Tied to landscape and culture, basket making is a diverse, international craft with overlapping traditions from around the world

    My first foray into basket making started innocently. I found a kit at a craft fair, consisting of nothing but a needle, and a folded page of instructions and reams of raffia dyed in an ombre blue-grey. The picture on the front of the box showed a woven pot housing a rubbery succulent. The instructions were simple and I quickly found myself in a methodical rhythm, a coil of raffia slowly growing, curving, taking shape under my fingers.

    All of this happened before I spoke to Cassie Leatham, a Taungurung master weaver. I suspect it is how many people under 21st-century capitalism go about learning a craft as old as basket making. But it was in speaking to Leatham that I began to think there may be a more considered way to go about it.

    Continue reading...
    • chevron_right

      Test xTool Screen Printer : la sérigraphie n’a jamais été aussi simple à la maison

      news.movim.eu / JournalDuGeek · Friday, 29 March - 15:04

    Sp22

    La xTool Screen Printer réinvente la sérigraphie en intégrant la gravure laser, rendant la sérigraphie de précision de niveau industriel plus accessible que jamais, tant pour les débutants que pour les professionnels. Présentée comme la première solution de sérigraphie à domicile tout-en-un, permettant de réaliser des projets en une journée et en toute autonomie. Nous avons testé ce produit assez intriguant.
    • chevron_right

      Brewintosh – Le Macintosh imprimé en 3D

      news.movim.eu / Korben · Thursday, 21 March - 15:09 · 1 minute

    Vous pensiez que les ordinateurs Macintosh vintage étaient condamnés à prendre la poussière au fond d’un placard ?

    Ah ! Grave erreur !

    Le génial Kevin Noki leur offre une seconde jeunesse grâce à l’ impression 3D et un bon paquet d’huile de coude. En effet, après des mois de labeur acharné, ce passionné (comme vous !!) a réussi l’exploit de donner vie à son « Brewintosh « , une réplique complètement fonctionnelle et aux dimensions exactes du mythique Macintosh 128K . Sous son apparence d’ordinateur tout droit sorti des eighties, cette merveille de rétro-informatique cache des entrailles résolument modernes.

    La vidéo est sympa car sans blabla… Y’a un petit côté contemplation méditative que j’aime bien.

    Fini le processeur Motorola 68000, bonjour le thin client sous Linux !

    L’astuce ? Avoir recréé la coque du Mac en impression 3D pour pouvoir y loger tout un tas de composants dernier cri, comme un écran LCD de caisse enregistreuse ou un lecteur de disquettes USB customisé.

    Grâce à un savant bricolage de cartes Teensy et Arduino, Kevin a même réussi l’exploit de faire tourner Mini vMac , un émulateur Mac, sur son Brewintosh. On peut ainsi y insérer des disquettes virtuelles pour booter le système ou y brancher une carte SD pour partager des fichiers. Classe !

    De quoi vous donner envie de ressusciter votre vieux Mac Plus qui dormait au grenier !

    Source

    • chevron_right

      How to restore a leather handbag at home

      news.movim.eu / TheGuardian · Monday, 18 March - 14:00

    Handbag rescue videos are one of TikTok’s most wholesome, soothing trends. And as a professional handbag repairer confirms, the results are achievable at home too

    An hour into researching this piece I found myself on the resale platform Depop looking for vintage Coach bags. It’s not the first time writing about fashion has brought me close to buying something, but in this instance my desire came from a new place.

    I didn’t just want a bag, I wanted a beat-up leather bag from the 1980s (when Coach was still made in New York) so I could try and restore it following the instructions of the videos I’d seen on TikTok. Watching someone thoroughly clean and condition an old leather bag till it’s plump and smooth, while they calmly explain what they’re doing, is so incredibly satisfying I wanted to experience it myself.

    Continue reading...